First cooking class!
 |
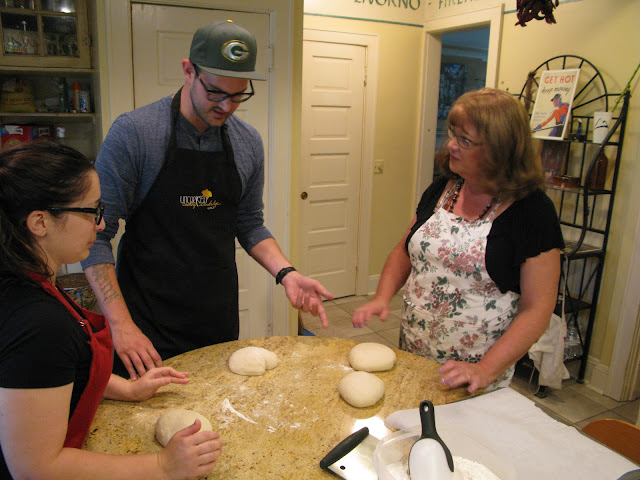
| Jessi, left, and Ken Harris are ready to shape their baguettes. |
Jessi has made bread before but Ken was starting from near-zero knowledge. However, he could no doubt now get a job in a French bakery. Also, both are fully qualified dairy workers now.
They shaped the dough into baguettes and we let them proof in a barely warmed oven. I'd prepared the dough ahead of time to speed up production of the first loaves - otherwise the class would take six hours. Once the loaves were rising, we started a new batch of bread so they could see how to mix and knead.
Ken quickly progressed from dough torturer to master kneader. Everybody agreed that 12 minutes of kneading, when not spread among three people, would be a great workout. I often use a KitchenAid at home for this, but I've also come to believe that even so, the last few minutes of kneading should be done by hand. I just think it gives you a better feel for whether the dough has been kneaded enough. When the timer went off, it still didn't seem as lustrous and smooth as it should, so I gave a few more minutes of kneading, and everybody could see the difference. I formed it into a round mass and explained that I can tell bread dough is ready when I pat it and it feels like a baby's butt. Ken suggested I should have a baby at all future classes for comparison purposes, and we all agreed there shouldn't be any hygiene issues in having a bare-butted baby crawling around the cooking surface. (Now auditioning baby bottoms! If you have a baby, bring him or her along to the class!)
At that point we set aside the freshly mixed dough and moved onto the cheese-making portion of the class. Cheese is one of those things that very few people realize you can make. While aged cheeses are more than I care to tackle, some cheeses are quick and easy to make. Mozzarella is surprisingly easy to make, and it's fun to watch a gallon of plain old milk turn into cheese.
 |
| Pouring the rennet into the milk. |
I order my cheese-making supplies from Leeners.com. When I first started making cheese I used plain old Junket from the grocery store, but I get much better results from the vegetable rennet I get from Leeners.
At first your milk will just look like it's a little off, but as you heat it and add the acid and rennet, the milk separates into curds and whey.
 |
| Note that the curds and whey have separated. |
I like using a glass lid because while the curds set, you aren't supposed to disturb them. The see-through lid allows you to see that all is progressing well. Time to move on to making butter!
Butter is extremely easy to make. The simplest thing to do, as I've said in previous posts, is to make whipped cream and take it a little too far. We used a hand mixer, got to the whipped cream stage, paused to sample the whipped cream, then relentlessly continued mixing until the fluffy white whipped cream became clumpy yellow stuff. At that point, we pressed the clumps of butter together with a spoon. That's all there is to it! We took the additional step of dropping the clump of butter into an ice water bath and squeezing the butter to wash out the milk solids, but you don't have to do that if you think you'll be eating the butter within a few days.
 |
| Washing the butter ... |
We stirred in salt to taste, and took out a portion and made honey butter - which is nothing more than stirring a little honey into butter.
By that time, the bread was out of the oven, which was good, because we needed something to spread that butter on!
 |
| Fresh bread! |
The cheese pot had had its 20 minutes rest, and it was time to turn disgusting curds into cheesy deliciousness
 |
| Looking kind of curdy ... |
We drained off the whey, then the curds underwent heating and pressing, in order to squeeze out all the whey, then we kneaded it (using a plastic spoon to avoid burning the bezeejers out of our hands) and worked in a little salt.
 |
| Look! From milk to curdy mess to actual cheese! |
It's awfully tough to beat the taste of fresh, warm mozzarella scarfed down plain, but we managed. This time of year I have fresh basil in the garden, so we made a rather unique caprese salad by encasing cherry tomatoes inside the warm mozzarella, then adding torn fresh basil leaves and drizzling the whole thing with good olive oil (and a touch of salt and pepper, of course).
 |
| Caprese salad! |
 |
| A cherry tomato encased in mozzarella - and then bitten. Delicious! |
In three hours, we had made French bread, fresh butter and honey butter, mozzarella and caprese salad. Not bad! Thanks to Harrie Teheux for shooting all the pics, and thanks to John Reedy, as always, for letting me use your kitchen. Thanks to Ken and Jessi for going first!


Comments
Post a Comment